
Tarte Tatin
For the March Daring bakers’ challenge, Korena from Korena in the Kitchen taught us that some treats are best enjoyed upside down. She challenged us to make a tarte tatin […]
For the March Daring bakers’ challenge, Korena from Korena in the Kitchen taught us that some treats are best enjoyed upside down. She challenged us to make a tarte tatin […]

Belated lunar new year wishes to you all! To celebrate, I made a ‘tear and share’ sheep shaped siopao, Baa Buns as my 18 month old daughter likes to call them. […]

For the month of January Jelena from A Kingdom for a Cake invited us to start this year with a dreamy celebration cake. She challenged us to make the Esterhazy […]

The November Daring Baker’s challenge took us for a ride! Luisa from Rise of the Sourdough Preacher challenged us to make Paris-Brest, a beautiful pastry celebrating the Paris-Brest bicycle […]

I celebrated my second wedding anniversary with heart shaped Sachertorte, made using Maya Gold orange chocolate by Green & Blacks. I served these mini cakes with crème fraiche and strawberries […]

For the July Daring Baker’s Challenge, Ruth from The Crafts of Mommyhood challenged us to bake a cake. But not just any cake; she asked us to add in a […]
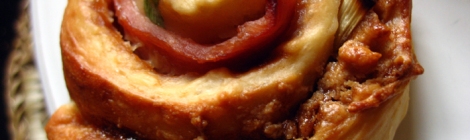
Matcha roll filled with dark chocolate spread & peanut butter This month the Daring Bakers kept our creativity rolling with cinnamon bun inspired treats. Shelley from C Mom Cook dared […]

It’s been 5 years since I gave up 15 years of pescetarianism. However, for National Vegetarian week (19-25 May) I decided to go back to a vegetarian diet. Here’s what […]

The April Daring Baker’s Challenge was hosted by Wolf of Wolf’s Den. She challenged us to Spring into our kitchens and make Easter breads reflecting cultures around the world. Pancakes, […]

Since becoming a mum, I now take any opportunity to get ahead of myself when the little one is napping, or happily playing on her own. In the […]
